Author
Simran Chaudhry

It should come as no surprise that organizations that have a project management process are far more likely to deliver projects on time and under budget than those that don’t. Despite this seemingly obvious fact, it’s surprising is that only 46% of organizations actually do make project management a priority. Whether or not you’re already part of that 46%, Microsoft Planner is a valuable addition to your business. Managing a project using Microsoft Planner can reduce the amount of redundant and highly manual work! Setting up a Planner board within a channel in Microsoft Teams for each of your projects allows you to manage many critical aspects of task management within your projects to save you time and money.
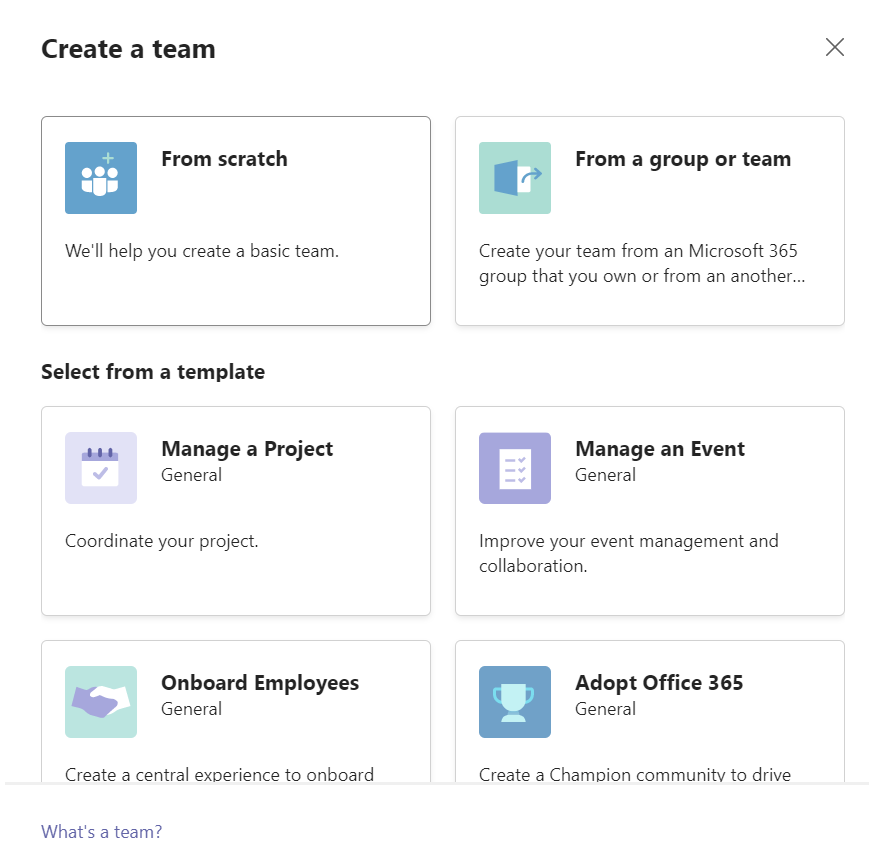
1. Create a Team for your project
The first step in starting your project management process is to determine who you need in order to complete this project from start to finish. Once you have determined which employees need to be included in this project (the dream team), you can create your Team. By creating a Team within Microsoft Teams, all conversations, files and information will all be accessible in one place. You can also add different channels within the Team for different parts of the project to reduce clutter and amp up your organization. To create a new Team, click the Teams icon on the side panel of your Microsoft Teams application, this will take you to your current Teams. At the bottom of this page, you will see the option to “join or create a Team”. Once this button has been selected, you’ll be able to create a Team from scratch or from a pre-existing Microsoft 365 group. Microsoft Teams also allows you to choose a template, when you’re creating a Team for the purpose of managing a project selecting the “manage a project” template is a great option!
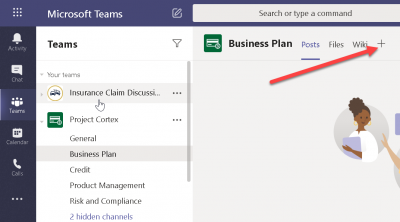
2. Select a channel and add the Planner app
Once your Team and channels are created, this is where the project management can really start. The Microsoft Planner application can be added as a tab to any of your channels. Simply open the desired channel and click the plus icon on the top toolbar. In the search bar search “planner” and select the application called “Tasks by Planner and To Do“.

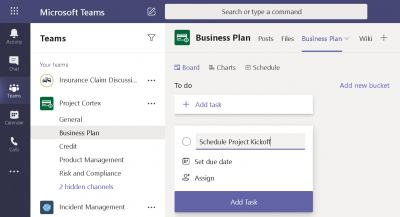
3. Start adding your tasks and your buckets
You now have your Team ready and Microsoft Planner added as a tab. You can take the opportunity to rename the tab to anything you want – most likely something that is relevant to your project. We won’t judge if you go crazy and call it Chuck Norris, though. It’s your tab, you name it what you want! Within Microsoft Planner, you can create what we like to call “buckets“. If you’re familiar with Trello, then you have worked with buckets already.
Buckets help to split up the tasks and keep Microsoft Planner organized. You can define the buckets that are useful to you. Some common ways to create your buckets would be to have a bucket for each phase of the project or for each Team member. Within each bucket, you can add tasks. Your task will show up within the specified bucket and will be presented in the form of a checklist that can be manually checked off when completed- a great visual element to help you achieve your tasks and see where your team is at. There’s a variety of ways that you can customize your tasks in Microsoft Planner to clarify expectations and enhance your project management process. Here are a couple of examples:
- Assign a task to a specific Team member
- Set the priority of the task from ranging from low, medium, important, to urgent
- Create a due date that the task needs to be completed by
- Add additional comments into the ‘notes’ section that the member completing the task should know
- Create a checklist within the task of the smaller steps that need to be accomplished to finish the overall task
- Add any attachments that are necessary for the task to be completed
Quick tips
This is just a start to what you can accomplish with Microsoft Planner. Here are a couple more quick tips to amplify your Microsoft Planner experience.
- Create a planner board and link it in your teams
- Take advantage of tasks that get entered, assigned and dated as they get automatically tracked
- Utilize reminders to complete tasks – they can be automatically sent to team members via email
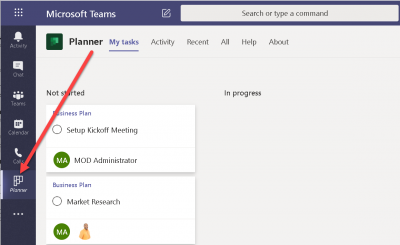
- Use the Planner personal app to see your Tasks across all of your projects
It’s that easy! Sure, learning how to use a new application takes a little time, but considering the amount of time, energy, and money you’ll save using Microsoft Planner for your project management process it’s all worth it! Start prioritizing your task management now, and implement Microsoft Planner to do so.
Change is a good thing, especially when the way we work has never changed so fast! Keep up with the pace of your technology and learn how business transformation can be a lifesaver in our latest eBook “Transform”