Author
Noorez Khamis

Nowadays, digitizing forms is not as simple as copying the current layout and design from paper-based documents. The purpose of digitizing should help make the form easier for the end-user to navigate and complete—not to give them a headache. Not only does digitalizing allow employees to complete forms during the work-from-home environment we now live in, but it also allows businesses to organize, and streamline the process.
In this post, we will concentrate on the layout of the digital form, walking through how to take an inspection Word document form and digitize the layout using PowerApps. Using the accordion method provides the end-user with a more bite-sized and manageable approach to completing the form. Keep in mind, the steps below are written assuming the reader has basic knowledge of PowerApps.
By following the steps below, we can make any form look stunning on both mobile and tablets layouts!
Step 1: Import/Enter the form questions into a data source
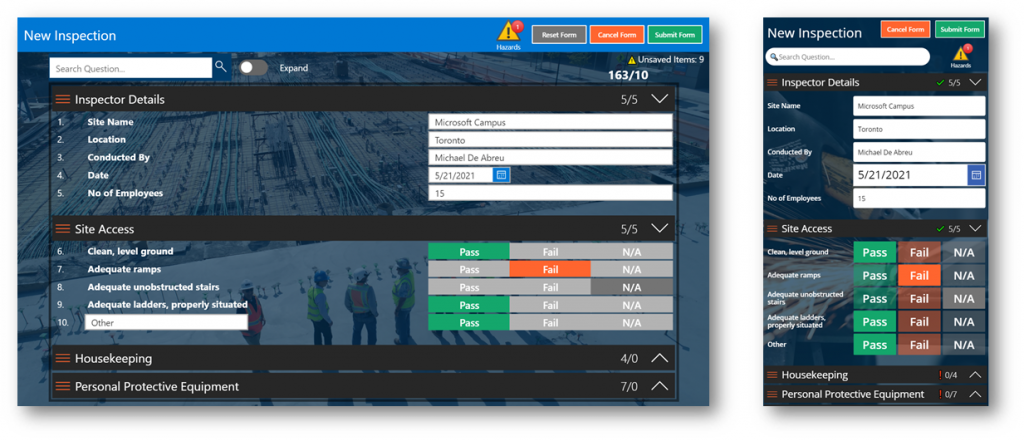
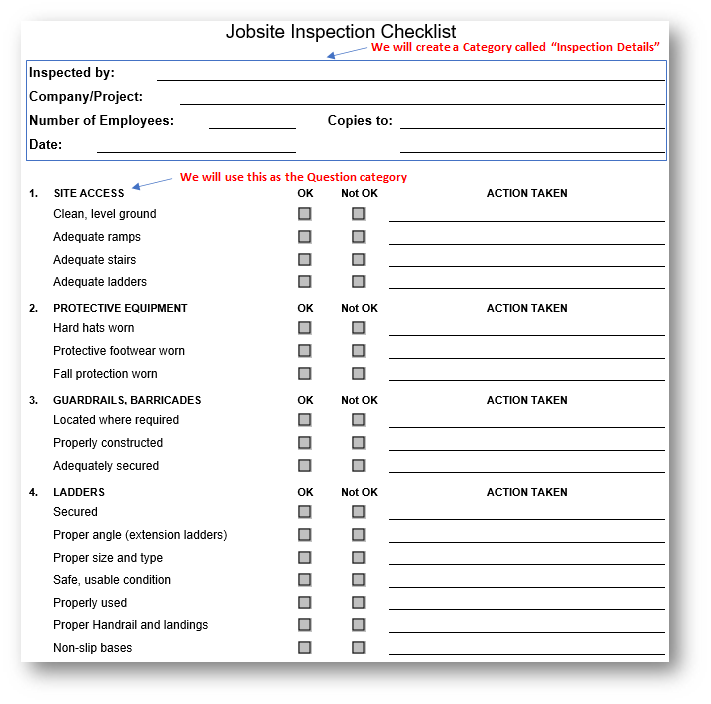
We can digitalize almost all word document forms with PowerApps! For our example, we will be digitalizing a job inspection checklist to automate the form more efficiently.
(source: https://www.ontario.ca/page/safety-standards-certificate)
In this example we will use a SharePoint List as seen below:
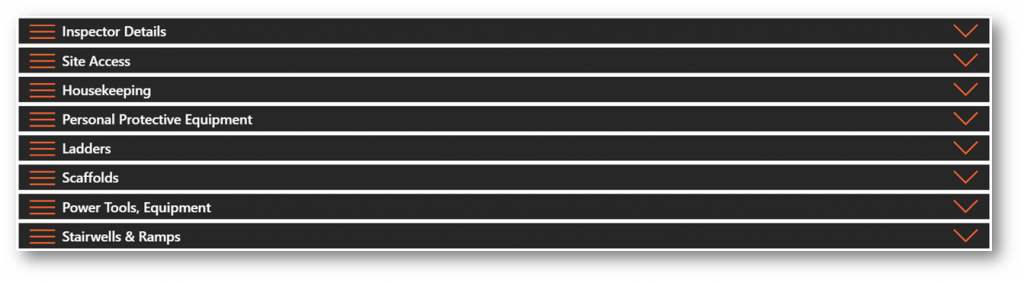
- Title: We will use this for the Question Category.
- Question
- Type: We will use this column to determine what control to show in PowerApps.
- Text: This will be used to show a Text Input control
- Date: Will be used to show a Date Picker control
- Choice: This will be used to show a Choice selection.


Step 2: Import and edit data source into PowerApps
- Connect PowerApps to your data source.
- Optional Step: For the best performance put your Questions into a Collection.
- In this example, we will put the SharePoint list mentioned above into a collection and only bring in the columns we need for the best performance. See formula below:
- Formula:
ClearCollect(cInspection,ShowColumns(SupervisorInspection,”ID”,”Title”,”Question”,”Type”));
*Important to bring in the “ID” column that is auto-generated in all SharePoint Lists as we use this column to join our answers to questions in the data entry piece.
- Insert a Blank flexible height Gallery. (Important that the gallery is flexible height)
- Size the width of the gallery as required on your screen.
- Set “Show scrollbar” to false.
- Set the Items of the gallery to your data source grouping by the “Title” column:
Formula: GroupBy(cInspection,”Title”,”title”)
- Insert a Checkbox Control into the gallery (My Checkbox name is “Checkbox”):
- Ensure the Checkbox Control is the full width of the gallery
- Set the height of the Checkbox that best suits your screen/question layout. (In this example we will be using a height of 30)
- Set both the X and Y axis to 0
- Set the Checkbox size to 0
- Clear the Text
- Insert an icon of your choice that will show at the beginning of each Category. This can be dynamic using the SharePoint list above you can extend a column to have a custom image URL per category if you like. In this example, we will just use a generic PowerApp icon called “Hamburger”.
- Set X and Y Axis to 0. Use the same height (30) as the check box. Set the width no more than 60.
- Insert another icon that will be used to indicate if the accordion is collapsed or expanded. In this example, we use the generic PowerApps “Up” icon. Set the height and width to match the Category icon from step 6.
- To show when the category is collapsed or expanded we will change the icon to either the “Up” or “Down” icon. To do this we will use an if statement on the Icon’s property selector select the “Icon” property and set it to Formula: If(Checkbox.Value,Icon.ChevronUp,Icon.ChevronDown)
Now the arrows will indicate when the category is expanded or collapsed. Set the colour to match your app theme.
- To show when the category is collapsed or expanded we will change the icon to either the “Up” or “Down” icon. To do this we will use an if statement on the Icon’s property selector select the “Icon” property and set it to Formula: If(Checkbox.Value,Icon.ChevronUp,Icon.ChevronDown)
- Insert a label and set the height/width to match the checkbox and set the Left padding enough to not overlap the icon. Set the Text field ThisItem.Title and Semi-Bold the text. Set the Colour of both the fill and text to match your app theme. Once this is done make sure you “Send to back” under the reorder option. At this step you should have something looking similar to this:
- Now, click the Gallery and insert a “Blank vertical” Gallery (My nested Gallery is called “NestedGallery”). (Make sure the gallery is inserted/nested into the flexible height gallery created above)
- Set the items to: Filter(cInspection,Title=ThisItem.Title) (This will now only show items in the nested gallery using the category from the parent as the filter).
- Set the width to the full length of the “Parent” gallery.
- Set “Show scrollbar” to false.
- Set the Y axis to Formula: Checkbox.Y+Checkbox.Height (This will ensure the gallery is always under the banner).
- Set the visible to: Checkbox.Value (This will hide/show the vertical gallery based on the Checkbox value in the outside gallery).
- Set the template size to: 30 (This is the height of each row. If you need more space you can increase).
- Set the Height to:
NestedGallery.TemplateHeightCountRows(NestedGallery.AllItems)+NestedGallery.TemplatePadding(CountRows(NestedGallery.AllItems)+5)
(This formula will dynamically size the gallery based on how many questions are under the corresponding category. If we set this statically you may end up with nested scrolling which defeats the purpose). - Insert a label and set the height to: NestedGallery.TemplateHeight
- Set the width of the label to half way (Need to leave room for the controls)
- Set the text to: ThisItem.Question
- Insert a TextInput Control and set the visible property to: ThisItem.Type=”Text” (Using the type column in the SharePoint list we can now control which questions will require a text input in PowerApps).
- Insert a DatePicker Control and set the visible property to: ThisItem.Type=”Date” (Using the same type column in the SharePoint list we can now control which questions will require a date selector).
- There are different methods to use for the choice fields. You can use Checkboxes, Radio buttons, Icons, buttons and a bunch more depending on how creative you want to get or what your form requirements are. In this example, we will use Buttons. Follow the steps below to create a 3 Button Choice field.
- Insert 3 buttons and have them aligned side by side. Set the text of each button to your required text for each choice. In this case we will set the text of the buttons to (“Pass”, “Fail”,”N/A”)
- Next, you want to set the colour of the buttons to something very light to indicate they have not been selected. You could use a lighter shade of the fill you will use of when they actually selected. (e.g. if Pass will be green you can set the fade really light green). In this case for the three buttons we will use the following:
- Pass set the Fill to RGBA(20, 167, 108, .6) and set the DisabledFill to RGBA(20, 167, 108, 1)
- Fail set the Fill to RGBA(255, 101, 47, .6) and set the DisabledFill to RGBA(255, 101, 47, 1)
- N/A set the Fill to RGBA(116, 116, 116, .6) and set the DisabledFill to RGBA(116, 116, 116, 1)
We set the DisabledFill property as we will disable the button once it has been clicked. This will be explained in the data capture post. - Now for all three buttons set the visible to ThisItem.Type=”Choice”
Hopefully, by following these steps, we were able to digitize the layout portion of any given form using the accordion method through PowerApps. Now that forms are digitalized, we’ve successfully automated a key business process! But hold on, We’re not done yet! Now that you’ve seen the power of PowerApps (no pun intended – or maybe it was), imagine how streamlined you can make your business processes using other Microsoft Power Platform tools. Determine which processes you can automate with our free Power Platform conversion assessment!