Author
Danielle

Every day your customer service team gets stuck answering the same questions, wasting your time and money. So how does one solve this? Most would say FAQ pages, but the reality is FAQ pages can be difficult to navigate, cumbersome, and outright boring. Just think of how many times you’ve sat there comparing the question in your head to the questions on the screen – it’s not fun, and if it’s not fun for you it’s probably not fun for your customers. Unfortunately, when your customers have to think, you risk losing a sale. Fear not! Virtual Agent bots allow you to automatically answer questions, bypassing all these issues.
- Navigation is easy, as all customers need to do is type in the chatbot as if they were texting
- Customers don’t need to think hard when comparing their questions to those on screen – that’s the Virtual Agents job
- Interact with customers in a personalized manner by customizing your bot’s personality
This article shows you step by step how to automate your Virtual Agent Bot to automatically answer questions using QnA Maker and Power Automate. It also teaches you some basic yet handy information about each step to help you find your footing.
How does the automation work?
Essentially, you’re using Power Automate to connect with and pull answers from a list of questions and answers (QNA). This allows you to automatically reply to customers using your Virtual Agent bot whenever they say something to it. And setting it up is easy; just follow these steps:
Before starting, make sure you’ve got these [prerequisites]
If you’ve already got these, you can skip to Connecting Your Virtual Bot to QnA Maker. If not, don’t worry. Follow these simple steps in this order:
1. Basic understanding of Power Virtual Agents and how it works
Power Virtual Agents allows you to build chatbots that can automatically answer questions from customers, employees, or visitors to your website. They’re easy to build and even easier to use. If you’re unsure where to start, learn how to set up your first Virtual Agent.
2. Basic understanding of Power Automate and how it works
Power Automate allows you to automate repetitive workflows using a low to no-code “if this then that” approach.
For this article, you’ll need to understand:
- Flows: The process you create to automate a task. There are a few different flow types depending on your needs
- Connectors: The services Power Automate “talks to” throughout the flow, think Outlook, Word, Excel, etc. In this case, it’s Power Virtual Agents
- Triggers: The event that kicks off the flow. In this case, it’s when your Virtual Agent bot receives a message from a user, most likely a question
- Actions: Instructions you want the computer to carry out. In this case, it’s your bot responding to the user
- Variables: Hold different kinds of information. Think of these as a placeholder for some value that you don’t actually know yet. In this case, it’s any question the user may ask the bot.
3. Create a QnA Maker resource on Azure
QnA Maker is an Azure service that deals with Natural Language Processing. Your bot calls on this service to search for answers. It’s pretty much the key to turning your data into conversations. Now, this may sound techie, but there’s actually zero coding required… and the best part is it’s free.
Follow these steps here to set one up
4. Connect your QNA Maker resource to your knowledge base
A knowledge base is your central location containing a list of every question and answer (QNA) related to a topic. This is the key where your Virtual Agent bot goes to ‘automatically’ find an answer. You create them by inputting a URL or uploading a file containing your QNA list. And yes, to those of you thinking (and worrying) ahead, you can test and edit every single question and answer after the knowledge base is created. Even better, every time you edit and save your knowledge base, you train the AI model to better accommodate the user experience.
Follow these steps here to set one up
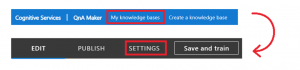
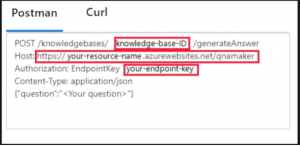
5. Publish your QNA Maker knowledge base Postman details
The Postman details give you 3 important pieces of information that you’ll need later on:
- Knowledge base ID
- Service Host
- Endpoint Key
Within QnA Maker Portal, you can find these details by going to My knowledge bases and opening your knowledge base. Then click Settings on QnA Maker portal. Scroll all the way down and you will see your Postman details
Once you have everything set up and ready to go, you can now create a Power Automate flow to connect to your QnA Maker knowledge base with your Virtual Agent bot!

Creating the flow within Power Automate [main steps]
For your Virtual Agent bot to automatically pull answers from QnA Maker, you’ll need to create a Power Automate flow that connects to the QnA Maker knowledge base.
Here’s a quick overview of the actions needed to connect your Virtual Agent bot to QnA Maker:
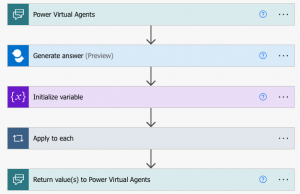
Step 1. Setting up the connector and trigger
Select Power Virtual Agents as the connector and When Power Virtual Agents calls a flow as the trigger
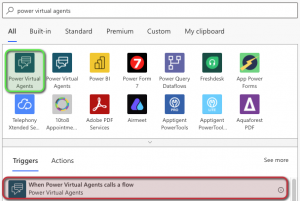
Within this step click add an input and select text as the type of user input. It’s helpful to rename and describe the input as Question.

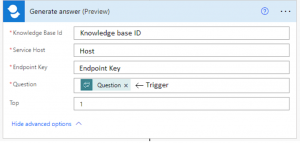
Step 2. Connecting QNA Maker to Power Automate
Insert a new step and search QnA Maker. Then select Generate answer (Preview) as the action. This will connect Power Automate to your QnA Maker knowledge base.
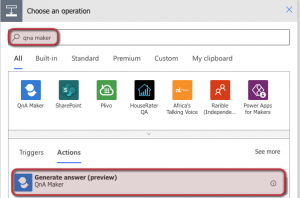
Remember the 3 Postman details from the previous step? You need to input that information here. It also asks you for the question. Select Question (this comes from the user input you named as Question in step 1).
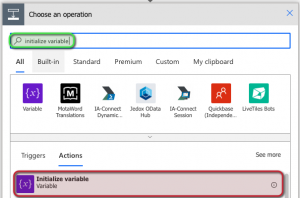
Step 3. Initializing your variable
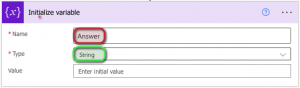
Now you need to pass that information to a variable. Insert a new step and select initialize variable. Power Automate uses these variables to automatically call into QnA Maker and find a response for your user.
Within this action name your variable Answer and set the type to string. You need a string variable because they hold values that are treated as text. You can leave the actual value blank.
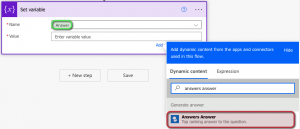
Step 4. Setting your variable
Insert a new step and select set variable as your action.
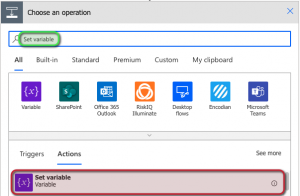
Within the action your initial variables name from step 3 will appear, select it. Then select Answers Answer as the value.
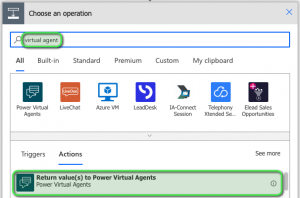
Step 5. Sending the automated answer to your Virtual Agent bot
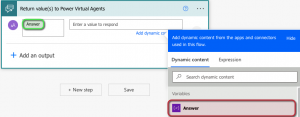
Insert a new step and select the action Return value(s) to Power Virtual Agents. This will return the answer found from your knowledge base to your Virtual Agent bot.
Within the action add an output and select text. Enter Answer as the title and select Answer as the response value. This value is the Answer variable you set up earlier.
Don’t forget to save your flow.
Congratulations! You’ve set up your Virtual Agent bot to automatically answer any inquiry your users throw at it. The last thing to do is select the flow you just created in your Virtual Agent bot.
Implementing the automated flow [final step]
Head back into Power Virtual Agents and select the bot you created for your QnA purposes. In your Virtual Agents authoring canvas add a node, hover over call an action and select the flow you just created.
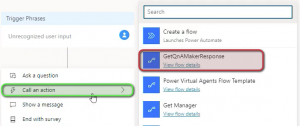
Within the action select Unrecognized Trigger Phrase as the Power Automate input variable. Then within the Message node select Answer as your variable (the variable we created in step 3). This step tells your Virtual Agent to search your QnA knowledge base and find a response whenever your users ask a question.

Now click save and you’re all set!
The days of FAQ pages are numbered, and now that you have an automated Virtual Agent, you’re miles ahead of the game. On top of that, your customer service team will thank you for freeing them of those repetitive questions and your customers thank you for their smooth experience when they run into issues – it’s a win-win situation!
The world of technology is complex, yet technology has become our world. Yes, keeping up with it is important, but it’s also difficult. If you’d like to continue evolving your business stress-free, we can help. Request a free Power Apps assessment with us.