Author
Danielle
What is a virtual agent?
Having a Virtual Agent on your website or intranet is the closest thing to replicating the experience of greeting your customers when they walk into your store. Virtual Agents are chatbots that can answer questions from your customers, employees, or visitors to your website. These bots can be created without needing developers. They can integrate with many of your systems, including MailChimp, Salesforce, GitHub, Dynamics 365, etc. Your Virtual Agent users ask questions just like texting a friend, and the bot replies with a response leading them to a solution. Virtual Agents don’t just process what the user types in; they also learn. Bots use interactions to interpret what’s asked by the user, even if there are spelling errors or grammar mistakes (which we all know happens way too often). Virtual agents learn as we type due to Machine Learning and Artificial Intelligence.
Still not sold on the idea of a Virtual Agent? Virtual Agents are becoming more essential as younger generations enter the workforce. In fact, Gen Z has surpassed millennials (23%) as the largest generation, making up 32% of the worldwide population, according to Bloomberg. With most of the next workforce born with technologies, it’s only normal to expect answers on the fly. Gen Z will no longer go out of its way to look for your organization’s contact information for help. If they don’t find what they’re looking for, they’ll simply find someone else who can give them the information quicker.
The benefits of a Virtual Agent don’t stop at customer satisfaction either. They can also help with anything from HR to Sales, on any site or channel imaginable. No matter what your company is, Virtual Agents can benefit you. Some common uses for Virtual Agents include:
- Sales help and support issues
- Opening hours and storing information
- Frequently asked questions
- COVID-19 information
Lastly, you can empower your team by allowing them to build bots themselves and giving them a sense of accomplishment. To have your first one up and running within minutes, follow these steps:

* Power Virtual Agents is now offered by Copilot Studio *
The steps to creating your own virtual agent:
-
To get started, make sure you have the correct permission and license that is required to build a chatbot. Once you have that, we can get started on building!
-
Sign in to https://web.powerva.microsoft.com/ on your browser.
-
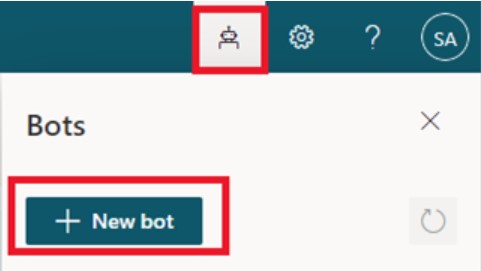
On the top right corner, click on the bot icon and then click new bot:
-
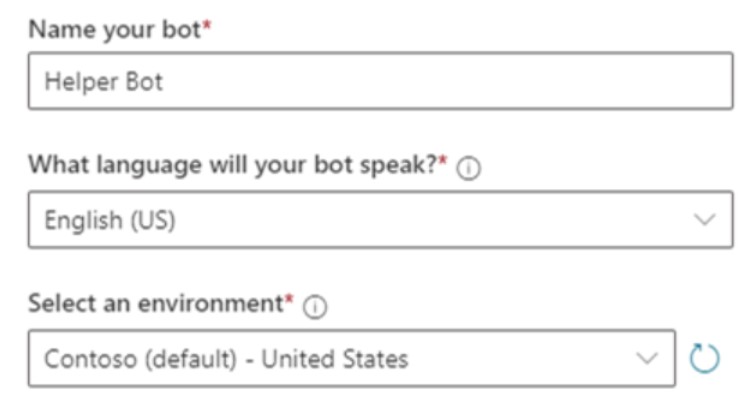
Give your bot a Name and select the Language. If you are not an administrator, choose the environment your IT team provided.
-
Once all the fields are filled out, click Create. This may take a few minutes.
-
Once the Virtual Agent has been created, you will be redirected to the home page of the bot where you can customize the topics you want the bot to cover. Below are the three ways to create topics for your virtual agent.
a. You can use the pre-added topics to start a conversation with your bot
b. You can create custom dialogue
- Click new topic
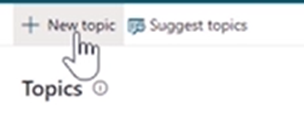
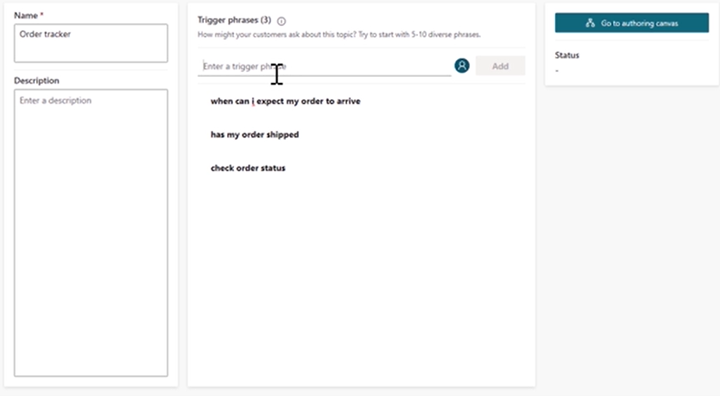
- Name your topic and give it trigger phrases, the phrases do not need to be an exact match to what the user might enter
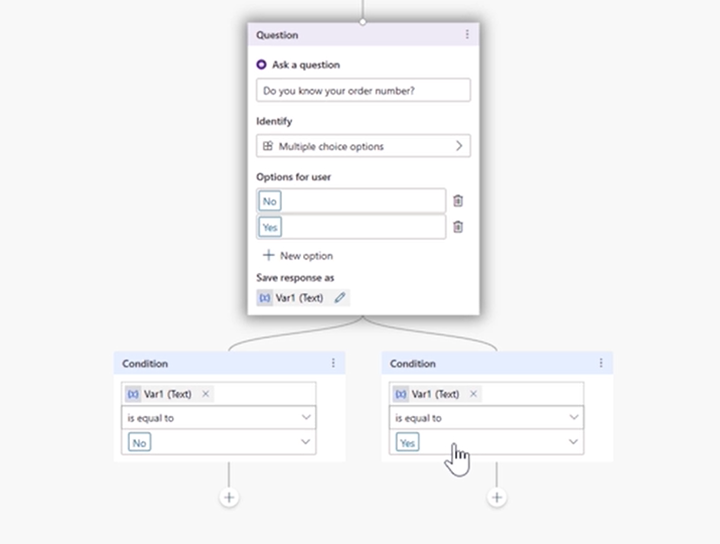
- Next, go to the authoring canvas where you can customize the format of the bot’s answers (example, multiple choice). You can also add flows, variables, calls to action, and more!
c. Add topic suggestions from other websites
- First, go to Topics and then click suggestions to get started.
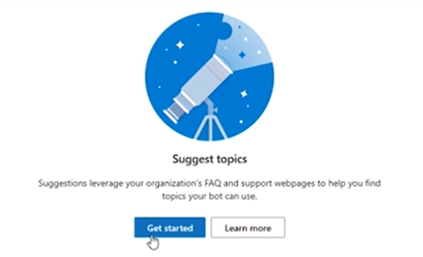
- Add links to websites you want to include
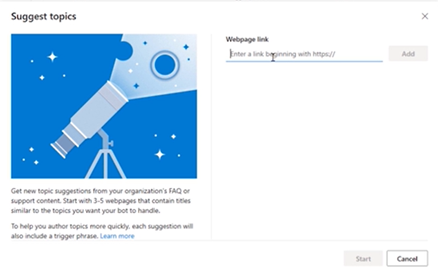
- Click start. When it’s done it will tell you how many suggestions were added. You can add any of these topics right to your bot.
7. After you’re happy with your customizations, you are ready to Publish! 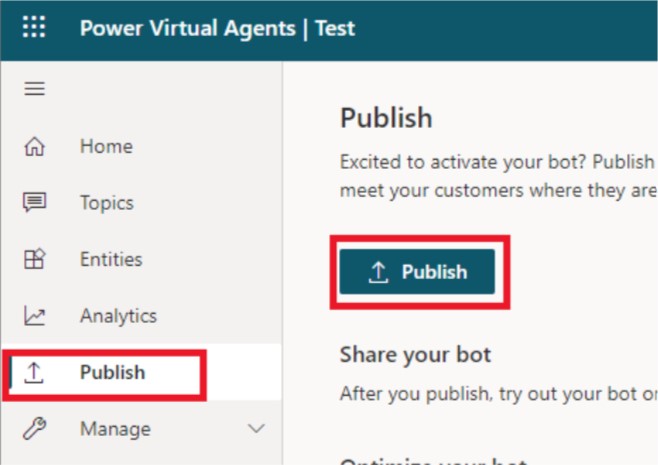
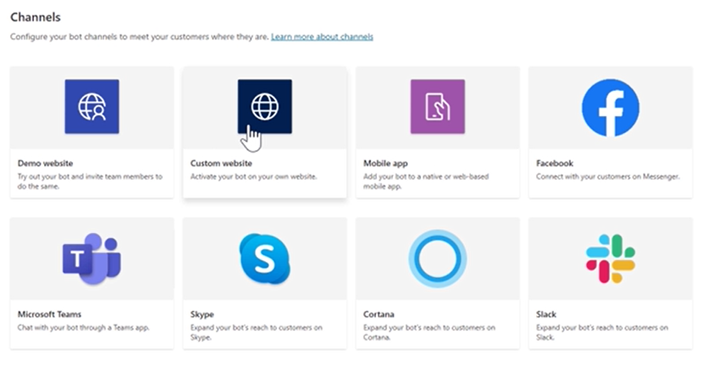
8. Finally, you need to decide where you want to install the bot: in Teams, your corporate SharePoint intranet, website, etc.
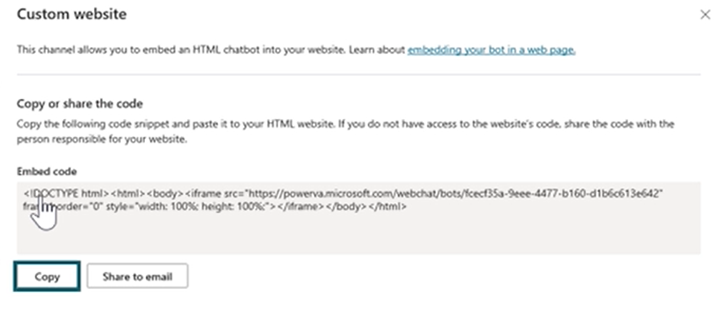
- To add it to your website, click channels and then custom website. You can then copy and add your HTML i-frame snippet to your website’s source code.
Now that you have successfully created a chatbot with Power Virtual Agents, you can dive into the advanced features and monitor how your bot performs. Gain in-depth insights and get to know the people visiting your website. Learn what they are looking for or which questions keep them from engaging further with your organization. This simple task can save you hours of repetitive work through automation and AI.
To gain more knowledge about Power Virtual Agents and the rest of the Power Platform, you can request a free Power Apps assessment now!