Author
Noorez Khamis

We all live hectic professional lives, and finding ways to win back precious time is essential. Booking meetings in the corporate world should be an Olympic sport. Stop wasting precious time communicating back and forth to book meetings! Microsoft Bookings allows you and your customers to save time and efficiently get that first meeting booked in your respective calendars.
What is Microsoft Bookings?
Microsoft Bookings is an application available to you through a Microsoft 365 subscription, enabling you to create a booking page for your business, a specific department, or an individual. It’s a scheduling tool where customers can manually choose a meeting date and time that works best for them. The appointment is then set automatically into your preferred calendar.
This application is customizable to suit your organization’s needs since you can choose to ask anything your organization needs to know about your leads or clients’ information in the registration form on the booking page.
Microsoft Bookings is relevant and suitable for any industry, whether healthcare, non-profit, education, or legal— you name it! Any service provider can benefit from implementing Microsoft Bookings into their operations, as it helps their sales team stay organized and allows the potential clients the flexibility to engage with you on their schedule.
How to get Microsoft Bookings?
Microsoft Bookings is accessible through your organization’s Microsoft 365 subscription to a business plan. Microsoft Bookings is available in the following subscriptions:
- Office 365: A3, A5, E3, E5, F1, F3
- Microsoft 365: A3, A5, E3, E5, F1, F3, Business Standard, Business Premium
Microsoft Bookings from customers’ perspective
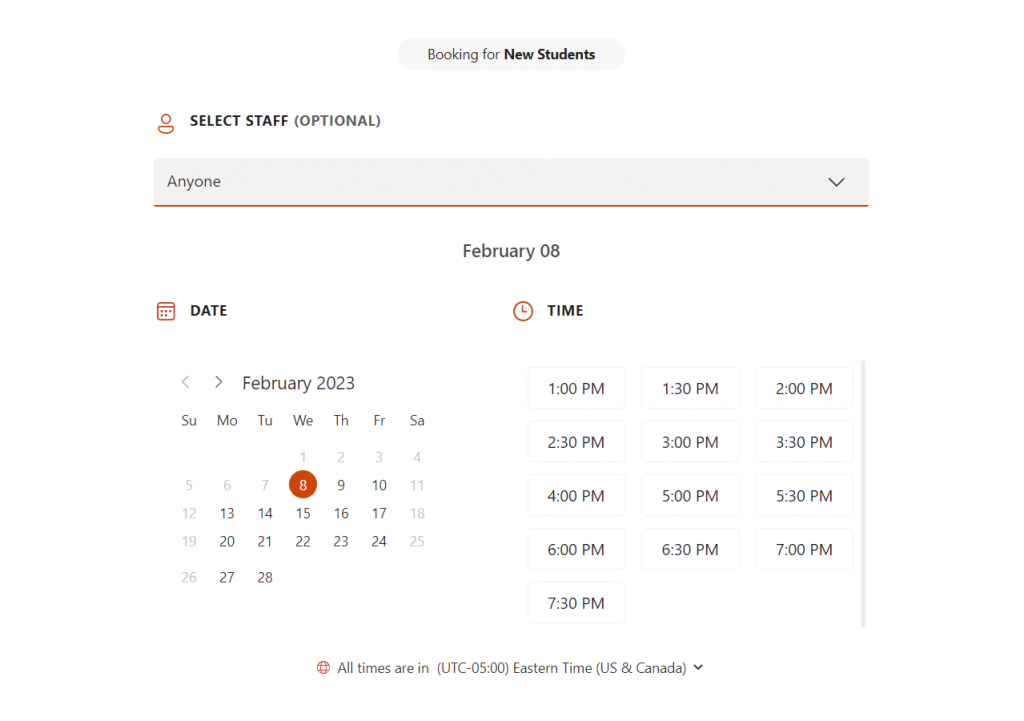
Once your organization has implemented Microsoft Bookings, customers and leads can access it from a link. You can publish this link on your website, email signature, LinkedIn profile, newsletter, or wherever you see fit. They will be prompted to select a date and time, and in a specific use case, you can ask them to choose which staff member they would like to meet. Here’s an example of what your page could look like:
Once they have chosen and confirmed a meeting time, the customer will need to add their contact information in the appropriate fields, such as their name and email, as well as any additional information they require.
For example, here at Creospark, we help our clients implement new Microsoft technological solutions in their workplace, so we ask potential customers questions like “what Microsoft Cloud services are you interested in?”. As an organizer, you can change this form to fit your business needs best, and asking for this additional information will help you gauge the theme of the meeting and adequately prepare.
Adapt your email follow-up communication to the lead’s chosen services or add a product score to your CRM platform to better nurture your leads. You can even push it further by connecting Power Apps and Power BI to your Microsoft Bookings form and creating some profiling processes for your potential clients. You can then use Microsoft business apps like Dynamics 365 Marketing to send automated email campaigns. The possibilities via automation and artificial intelligence in Microsoft Cloud are nearly endless.
Once booked and confirmed, customers will receive an immediate confirmation email including their meeting details (time, date, location, etc.). If the customer selected a virtual meeting, the link to the Microsoft Teams meeting would also be provided in this email. The confirmation email will allow the customer to revisit the main booking page, where they can reschedule, cancel or book a new meeting. One of the best parts about this: the meeting the customer scheduled is automatically added to their Outlook calendar as well as yours—no extra work or phone calls required!

Using Microsoft Bookings to its full potential
Microsoft Bookings is a powerful software, and with these tips, you’ll become a power user in a jiffy:
- Utilize email and SMS text notification reminders to help limit the number of no-shows at your scheduled meetings.
- For scheduled online meetings, take advantage of the flexibility of attending Microsoft Teams meetings through a web browser, mobile dial-in, Skype, or the Teams App.
- Download Bookings from your Teams application to schedule appointments without leaving the application.
- Alert your customers of the simplicity of booking a meeting by sharing your web-based scheduling page via a direct link, on your website, or through your social media accounts.
Keep your branding consistent with robust customization features
The Booking Page is where you set up what your client-facing booking page looks like.
To customize your booking page, sign in to Office.com and go to the Bookings > Booking page. You can customize the appointment setting page with suggested color themes or make your own. You’ll be able to connect to your social media, choose your scheduling policy, add a logo, etc.
Once you customize and publish your booking page, people will use it to book appointments with you. Customize your booking page to improve your brand awareness and brand consistency.
Visualize booking activity with reporting data
Bookings provide the option to view any four months of your Bookings calendar over the course of a year.
To retrieve this data, go to the main Bookings page, select export, and specify your desired date range. The data can be exported into an excel file and contain information such as customer contact details, meeting duration, event type, etc.
This data can be analyzed however you see fit and will assist you in visualizing your customer activity. Reporting data from Bookings can provide valuable insights into where your business operations can improve.
Define your service offerings for booking
Service offerings in Microsoft Bookings are the information that customers see immediately when scheduling an appointment. This information can be tailored to your business but often includes features such as service name, pricing, description, and duration of the service.
To add service details, sign in to Office.com, navigate to Bookings > settings > manage services page and select add a new service. On the basic details page, you can customize and add the service details you would like to be present when customers are booking an appointment.
Defining your service offerings in Bookings gives customers a clear understanding of what your business provides to ensure that all appointments booked are relevant prospects for your company.
Manage your staff through Microsoft Bookings
When customers schedule an appointment through your Bookings page, they often have the option to select a staff member or a team that they would like their appointment to be with. To provide this flexibility, a staff list must be created with each member’s details and working hours.
To manage your staff through Bookings, go to the manage staff page and click add staff. From here, you have the option to customize your staff’s details.
Once staff has been added to Bookings, customers can choose their meeting preferences. Adding staff to your Bookings will create flexibility and clear expectations for future meetings.
With Microsoft Bookings, scheduling a meeting is easier than ever! By taking control of your meeting booking process through automation, you can drive more business for your organization. Don’t know where to start with your Microsoft Booking implementation, or are you looking to automate your booking process? Book your consultation below: