Author
Simran Chaudhry

The purpose of Microsoft Power Automate is to make your life easier. Automating tasks removes manual work and ensures that your time is being used in the best way possible. With Power Automate the possibilities are endless. However, seeing as we don’t have an endless amount of time, we’ll be covering a short topic that can go a long way. Configuring the “run after” command in Microsoft Power Automate gives you the ability to invoke specific actions after a successful or failed action has occurred, which can be critical when you are implementing your Flows.
What is the “Run After” command?
Let’s rewind a little and go back to the basics – what is Microsoft Power Automate? If you already know the answer to this question, bear with us. However, if you don’t, this is for you! Power Automate allows you to make workflows for all types of tasks. You can automate tasks, collect and transfer data, and set reminders – and that’s just the beginning! Check out our blog post here to learn a little more about Power Automate!
The possibilities are endless with Power Automate. That’s why we’re sharing some features that tend to get overlooked. There is a feature of Power Automate that not everyone is aware of – despite it being extremely useful. That’s the “Run After” capability.
This feature allows you to automate a certain action to occur only if another action develops in a certain way. For example, instead of getting those annoying emails whenever one of your flows fails, you can configure the “Run After” for “has failed” and add in an additional step to send you an email detailing which flow has failed and when it has failed. This is simply one of the options that “Run After” presents you with.

How to configure the “Run After” command?
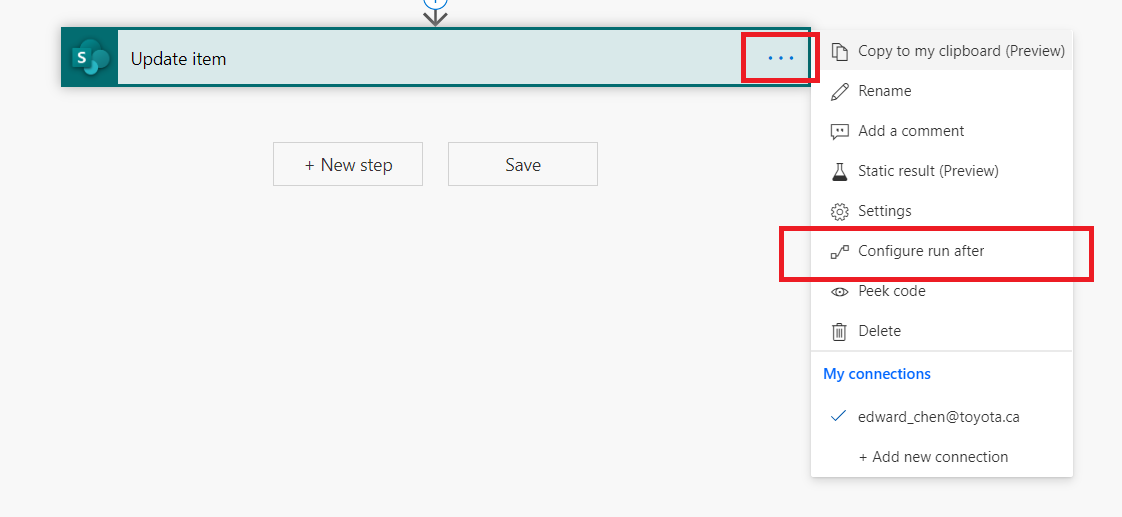
To start, you can configure “Run After” to almost all Power Automate actions by simply clicking on the three dots on the right corner of the step which you wish to configure. Select “Configure run after” from the drop-down menu. From there, you can select either one of the options or multiple options. For example, the following situation shows the configuration of the Run After handler after updating a list item in SharePoint:
In Power Automate, there are 4 options to choose from in which “Run After” can be configurated from:
- Is successful – If the action runs successfully.
- Has failed – An action has any type of failure (except timeout).
- Is skipped – An action was skipped. Actions are skipped either when a condition is not met, or when a previous action before that fails.
- Has timed out – An action times out. This can happen if the call to the backend times out (120 seconds), or for long-running actions such as approvals, after 30 days.

Once you have selected which option you would like, you have successfully implemented “Run After” into your workflow!
It’s that easy to configure the “Run After” command for Power Automate! Adding this feature to your workflows will reduce your manual work and ensure that they run just the way you want them to. Do you have automation in mind, but need help to kick-start it? Leverage our free PowerApps conversion assessment and let us help, no engagement is required!