Author
Prem Chandran
How Would a User Use Our Solution?
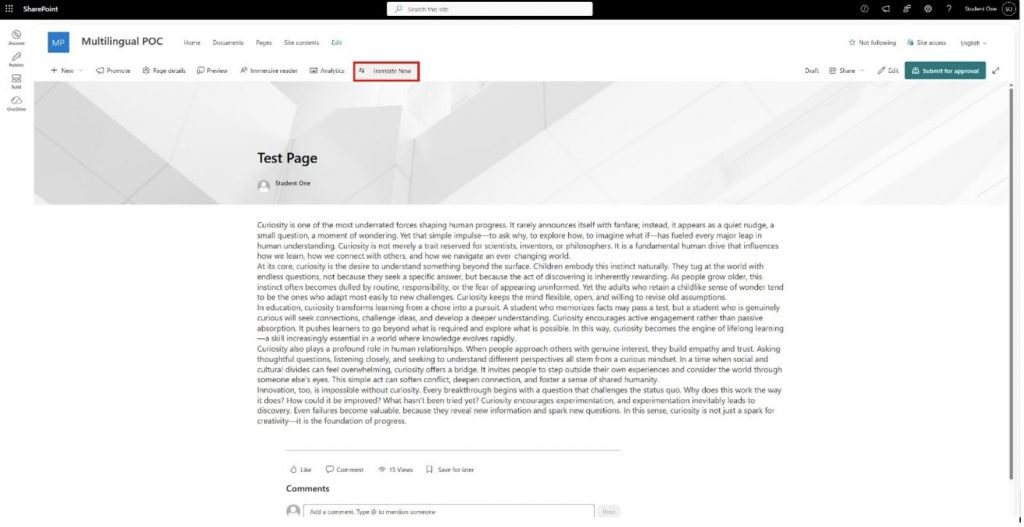
1. Users can start by navigating to a site page with our SPFx extension activated. Once the page loads, they’ll see a “Translate Now” button in the command bar alongside the standard page commands (New, Promote, Page details, Preview, etc.)
2. Clicking the button opens the “Translate page” panel on the right side of the screen. The panel displays the page name at the top and immediately starts loading the site’s available languages.
Once loaded you’ll see:
“Source language”: pre-set to the site’s default language (English in this case)
“Target languages”: a multi-select dropdown listing each configured language as either “Available” or “Unavailable”
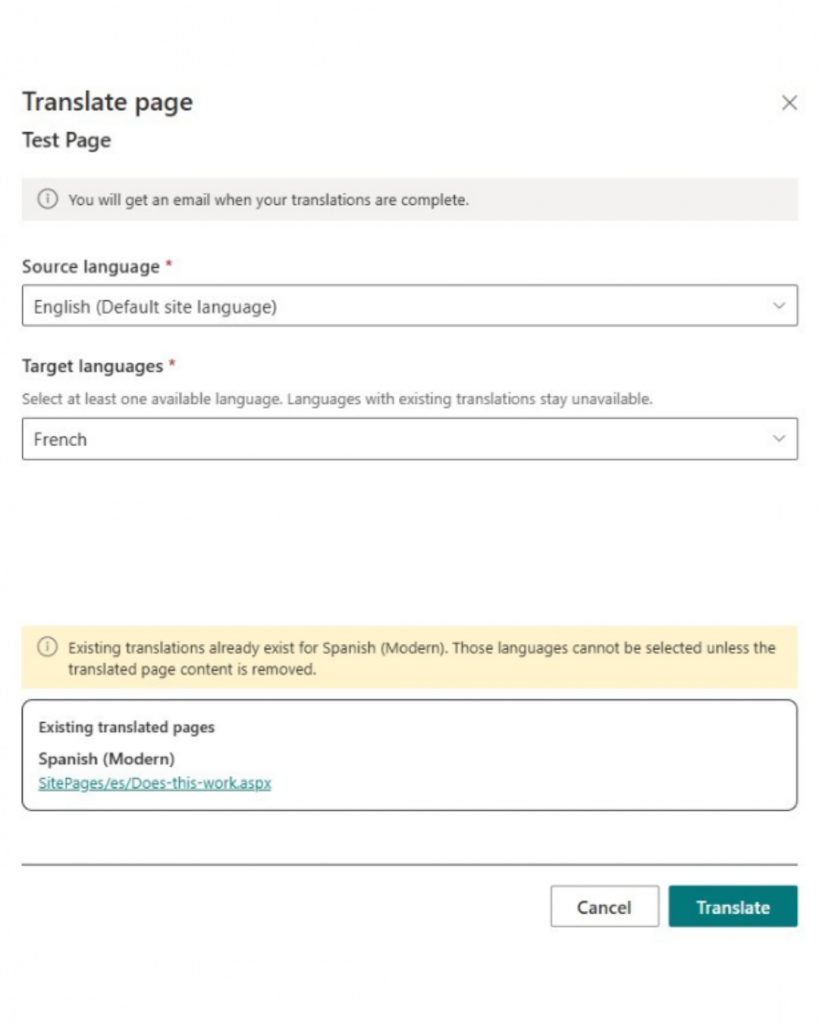
Languages marked “Unavailable” already have a translation page and cannot be selected again. In this example, Spanish (Modern) is unavailable because a translation exists at `SitePages/es/Does-this-work.aspx`, shown in the Existing translated pages section at the bottom of the panel.
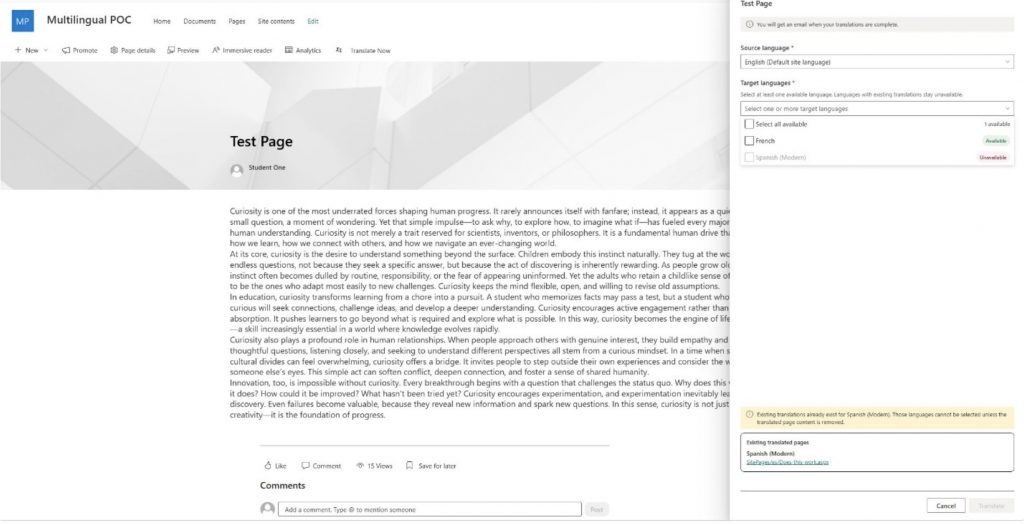
3. The user can then check the languages they want the page to be translated into. They can either tick individual languages or use “Select all available” to pick every available language at once. Here, French is selected as the single available language, enabling the “Translate” button.
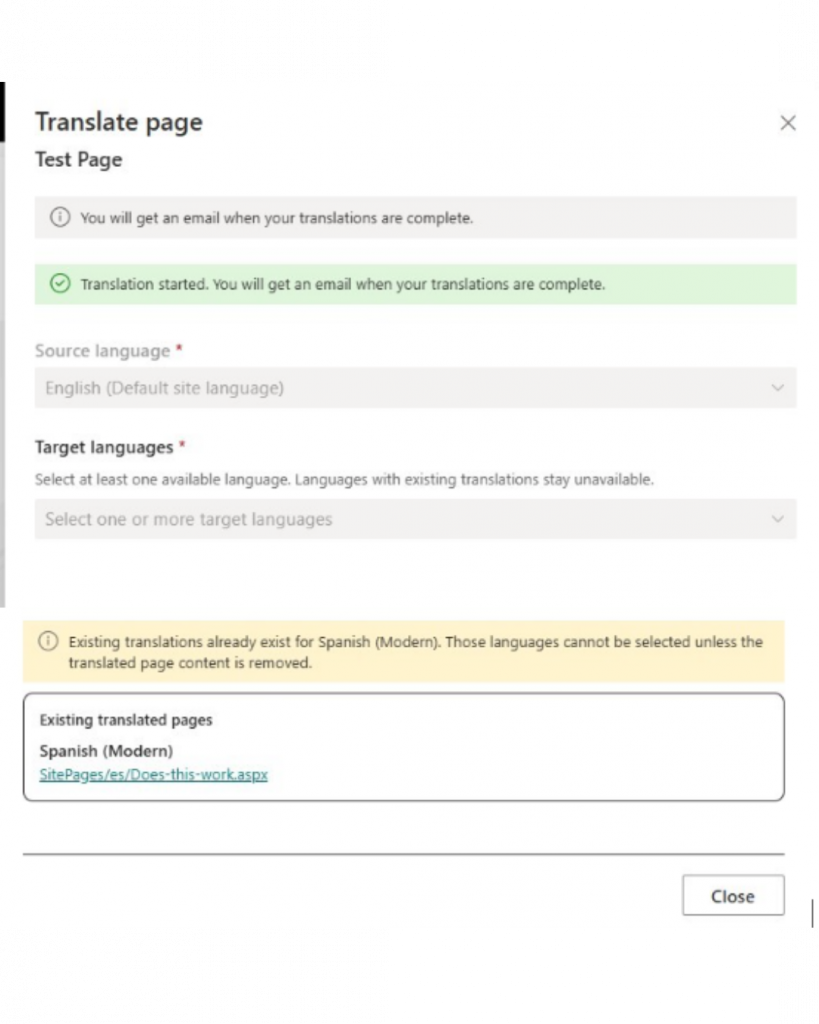
4. After clicking the translate button to submit the request. The extension sends the page details to the Power Automate flow running in the background. Once the request is accepted, the panel shows a green confirmation banner:
5. When the flow finishes processing, the user receives an email notification:

The SPFx Extension
The solution adds a Translate button directly into the command bar while viewing a SharePoint site page. Clicking it opens the Translation Panel, built with Fluent UI. Before rendering, the panel loads two things: the site’s configured languages and the current translation status of the selected page, ensuring users only see options relevant to them.
The source language dropdown automatically defaults to the site’s default language. The target language dropdown displays which languages are available or unavailable, and includes “Select all available” option for users who want to translate into every supported language at once. The Submit button remains disabled until there is at least one language combination that actually requires translation which prevents users from accidentally triggering a flow with nothing to do.
Once the user clicks Submit, the extensions build a payload and fires an HTTP POST to the Power Automate trigger URL. At that point, the frontend’s job is done and Power Automate takes over.
And the HTTP Post is handled like this:
const response: Response = await window.fetch(FLOW_TRIGGER_URL, );
if (response.status === 401)
if (response.status === 500)
Note: FLOW_TRIGGER_URL should never be hardcoded. In production, it should be stored in a .env file or another secure configuration source.
To learn more about building the extension side of this solution, the following resources are a good starting point:
The Power Automate Flow
Power Automate was chosen for the backend for a few key reasons. Its low-code environment makes handling complex logic such as looping through JSON blocks and calling AI services much faster to build and maintain than alternatives like Azure Logic Apps or embedding translation logic directly into the frontend extension. It also serves as a natural integration hub, tying together the SharePoint REST API for fetching and updating canvas JSON, the built-in SharePoint multilingual API for bulk page creation, the Azure AI Translator connector, and Office 365 Outlook for automated user notifications.
Page translation can also be time-consuming, particularly for large pages with heavy web part structures. Rather than keeping the frontend waiting, the extension fires a quick HTTP POST and disconnects. Power Automate then handles the checkout, patching, and check-in process asynchronously in the background.
Here is how it works step by step:
1.Receive the trigger payload: The flow is initiated by an HTTP POST from the SPFx extension, receiving the payload containing the site URL, page ID, target language codes, and the user's email address.
2.Initialize working variables: The flow sets up all necessary variables which includes LanguageCodeArray, CanvasArray, and PageID, which will be referenced and updated throughout the rest of the run.
3.Fetch the source page canvas JSON: A call to the SharePoint REST API retrieves the source page's canvas JSON, which contains the full structured page content as an array of web part sections.
4.Check for existing translation pages: The first loop constructs the expected SharePoint translation page URL for each target language and queries whether it already exists, collecting any missing ones into a LanguagePagesNeedingCreation array.
5.Bulk-create missing translation pages: A single HTTP call to SharePoint's multilingual API creates all missing translation pages simultaneously using the built-in /_api/sitepages/pages()/translation/create endpoint.
6. Fetch translation pages and evaluate content: The second loop fetches each now-existing translation page, resets the TranslatedCanvasContent variable, and evaluates whether the page still needs translation content applied.
7.Translate and patch the canvas JSON: For each page that needs translation, the flow loops through every canvas web part, detects the type, extracts all text fields, guards against nulls, and calls Azure AI Translator for each field. The translated values are then string-replaced back into the JSON. The flow checks out the translation page from SharePoint and saves the fully patched canvas JSON back to the page before checking it back in.
8. Send a completion email: Once all translations are complete, the flow sends a notification email to the requester so they know their translated pages are ready to review.