Author
ali.razmi

As we help our clients implement or improve their intranets, one feature they request (not a “top 3 requested feature,” but still pretty common!) is a way to post announcements on their intranet separately from their regular corporate communications or general news feed. So is this possible in Modern SharePoint? Not only is it possible, but today we’ll walk you through five fantastic ways to implement announcements in a Modern communication site, and guess what? Four of them are completely out-of-the-box solutions!”
Exploring intranet announcement options | Weighing the pros and cons
In this section, we’ll weigh the pros and cons of each approach, providing you with a quick breakdown. You can jump down to the sections you want to explore more and learn how to implement them effectively.
Intranet announcements as news pages
A quick and easy way to get announcements is to leverage the OOTB SharePoint concept of news pages.
Use News web part and two sites
Publish announcements in a separate site as news posts and use the News web part to roll them up to your intranet home page, separate from any other existing news web parts.
- Pros: The site name in the news web part helps to label your posts as announcements, news pages give you flexibility for short or long content, and the news web part allows you to separate out those announcements.
- Cons: Rolling up announcement pages from a different site doesn’t allow you to have expiration dates on your posts.
Use News web part and one site
If you want to have expiration dates for announcements, you can keep all your news pages in the current site and use categories and expiration date fields with the News web part filters to display both general news and announcements.
- Pros: Keep the OOTB SharePoint news functionality and have expiration dates for announcements.
- Cons: You lose the site title (which maybe is a pro?) and you’ll end up with a lot of pages in your main intranet site over time.
Use the Highlighted Content web part
If you want expiration dates with announcements on a separate site, you can roll up those pages with a Highlighted Content web part instead.
- Pros: Have an expiration date for your announcements so they don’t show on the home page.
- Cons: You’re limited to the layouts (grid view and compact view) that come with the Highlighted Content web part, and they don’t include a little blurb the way the News web part does. You’ll also need to map refinable managed properties as a SharePoint admin.
Use the PnP Modern Search web part
This powerful community web part can be configured to roll up your announcement news pages and display them with a custom layout template.
- Pros: Bring in “announcement” pages from any site and include expiration dates in your query, plus, you have full control over how the results look.
- Cons: You’ll need to map refinable managed properties as a SharePoint admin, and you’ll need a bit of front-end and search query code know-how to fully configure this web part (but we’ll show you how to do this below!). Also, as the results depend on search, your published posts will take a few minutes to show up.
Intranet announcements as List items
Perhaps you don’t prefer having a full page dedicated to each announcement, or maybe you’re transitioning from a classic SharePoint experience where you were accustomed to managing announcements through a list using the classic Announcements app. Regardless, if you appreciate the concept of straightforward announcements but are dissatisfied with the way list views display them, here are two alternative options:
Use List View Formatting
List view formatting is an OOTB way to transform the normal table/grid list view into something a little more custom and polished. Basic knowledge of JSON and front-end HTML styling is helpful, but our copy-and-paste starter code is below.
- Pros: No custom development needed, just patience and an eye for detail!
- Cons: List view formatting doesn’t work with rich text fields, so your announcements will have to be plain text. You also cannot roll up announcements to different sites, as the list view only works in the current site.
Use the PnP Modern Search web part
Okay – this is technically a “sixth” way but it’s basically the same idea as the last news page option, because the PnP Modern Search web part can be used for any type of crawled SharePoint content, including list items!
- Pros: You’ll have full control over the query and layout template, and you can roll up your announcement list items from any site to any site. You can also have rich text for your announcement text.
- Cons: You have to configure the managed properties as a SharePoint admin, then configure the web part wherever you want to use it, and your published item will take a few minutes to be crawled and show up.
How to implement the intranet announcements – a step-by-step guide
Use News web part and two sites
Remember, this is an easy way to separate your announcement content, but you won’t be able to have announcements expire.
- This assumes you have a main Communication site for your intranet “home,” where you want to display announcements. Set up a separate Communication site called “Announcements” or something similar. (The name of the site will show up in the News web part rollup.)
- In your Announcements site, create site pages and publish them as news posts.
- On your intranet home page, add a News web part. In the properties panel, under Select a news source,” choose Select sites and search for your Announcements site and select it. Choose your desired layout and other configurations.
This is what it might look like for you – you can have your main news web part for displaying your general corporate news, from your intranet site or as a rollup of other sites in your intranet, then, have your separate Announcements in a different news web part. The site title shows that the web part is pulling from a different site, which helps to reiterate that these are “announcements.”
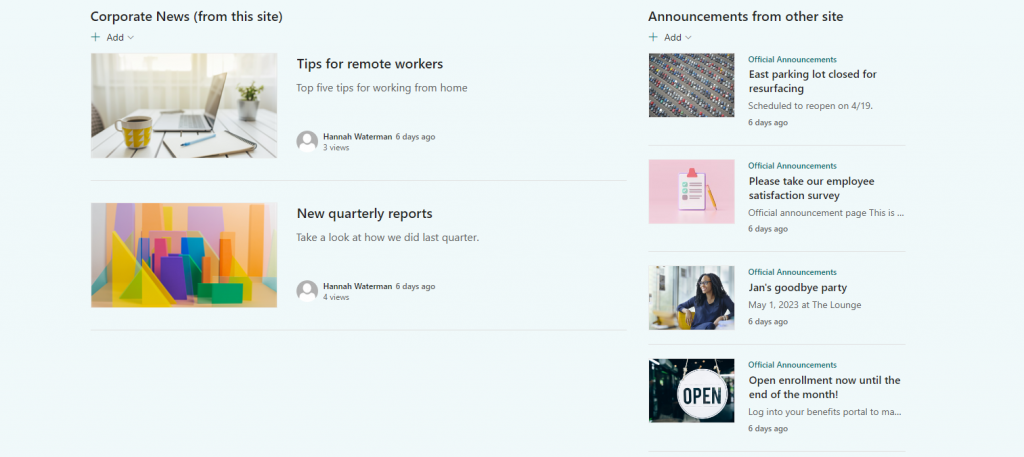
<Announcements01.png – Alt text: Screenshot of two news web parts side by side. The left web part shows corporate news from this site, while the right web part shows announcements from a different site>
Use News web part and one site
This takes a bit more setup, but you can have expiration dates by keeping your announcement news posts on your current web and adding some extra fields to your pages library.
- Click on the gear and go to Site Information, then click View all site settings. Click on Site columns.
- Click Create to create a new site column. Call this “AnnouncementExpiration” and choose Date and Time. Look for Date and Time Format and choose Date & Time. Click OK to create the column.
- If you already use managed metadata for tagging site pages or other documents, you may find it helpful to extend that to have a tag for “announcements.” If you don’t use managed metadata, you can keep things simple by creating another site column to help categorize your site pages. Click Create to create a new site column. Call it “PagesCategory” and make it a Choice column. Update your list of choices to whatever categories would be useful for your site pages – for example, “Announcements, Corporate News, Other.” If you think pages will have more than one category, choose the “Checkboxes” option. Click OK to create the column.
- Go to your intranet home site’s Site Pages library. Click on the gear and go to Library settings, then click More library settings. In the Columns section, click Add from existing site columns, then select the AnnouncementExpiration and PagesCategory columns, click Add, then click OK.
- Create pages for your announcements. When you are editing them, click the Page Details button to open the side panel, where you can set the PagesCategory and AnnouncementExpiration date. You must pick an expiration date for the rollup to work properly. Publish your pages as news posts.
- On your intranet home page, add a News web part. In the properties panel, under Select a news source,” choose This site. Choose your desired layout configurations. Under Filter, select Page properties, then use the first dropdown to find the PagesCategory property, keep the operation value to Equals, then select the name of your announcement category (“Announcements”).
- Click Add filter and choose Page properties again. Choose the AnnouncementExpiration property, change the operation dropdown to After, then type “[Today]” (with the square brackets) in the value box. This will filter the news web part to only the announcements type of site page which are unexpired.
- For your main news web part with intranet news, if your news pages are within the same site, you’ll need to add a filter to exclude the Announcements tag. Choose the Page properties filter, choose the PagesCategory, keep the operation to Equals, and deselect your Announcements category from the list.
- Your site might look something like this. It’s very similar to the first method, except that you don’t have the site name showing up in the news web part since all the pages live on the current intranet home site.
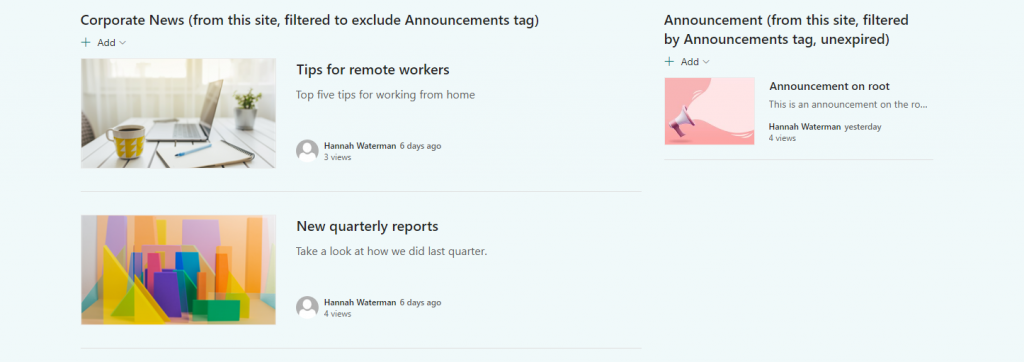
<Announcements02.png – Alt text: Screenshot of two web parts side by side. Left web part shows corporate news from the site, filtered to exclude the “Announcements” tag. The right web part has been configured to show pages from this site which are unexpired and have been tagged with the “Announcements” tag.>
Use the Highlighted Content web part
Roll-up announcements with expiration dates in a separate site with a little bit of setup.
- This assumes you have a main Communication site for your intranet “home,” where you want to display announcements. Set up a separate Communication site called “Announcements” or something similar. (The name of the site will show up in the News web part rollup.)
- In your Announcements site, click on the gear and go to Site Information, then click View all site settings. Click on Site columns.
- Click Create to create a new site column. Call this “AnnouncementExpiration” and choose Date and Time. Look for Date and Time Format and choose Date & Time. Click OK to create the column.
- Go to the Announcements site’s Site Pages library. Click on the gear and go to Library settings, then click More library settings. In the Columns section, click Add from existing site columns, then select the AnnouncementExpiration column, click Add, then click OK.
- Create pages for your announcements. When you are editing them, click the Page Details button to open the side panel, where you can set the AnnouncementExpiration date. You must pick an expiration date for the rollup to work properly. Publish your pages as news posts.
- You’ll need to map a refinable managed property, which requires SharePoint admin permissions. In the SharePoint admin center, go to More features, then click to open the Search feature, and click Manage Search Schema. Type “Refinabledate” in the search box and click the green arrow to pull up the refinable date properties. Look for a date that does not have anything in the Mapped crawled properties column and click the property name to edit. Scroll down to the mappings section at the bottom and click Add a mapping. Search for “announcement” and select the ows_q_DATE_AnnouncementExpiration crawled property. Click OK.
- Return to your Announcements site’s Site Pages library. Click on the gear and go to Library settings, click More library settings, click Advanced settings, and click the “Reindex Document Library” button. You may need to wait for SharePoint to recrawl your site – it may be as little as 15 minutes, but as long as a few hours.
- Go to your intranet home page and add a Highlighted Content web part. Under Source, choose Select sites, then search for your Announcements site and select it. Change the Type to News. Under Filter, choose Managed Property. Search for RefinableDateXX (where XX is the refinable date value that you mapped) and hit tab. Select RefinableDateXX from the Managed Property Name dropdown, change the operation dropdown to After, and type [Today] in the search value. Choose your desired layout.
Your site might look something like the screenshot below, depending on which layout you chose. Only non-expired pages from your announcement site will show up.
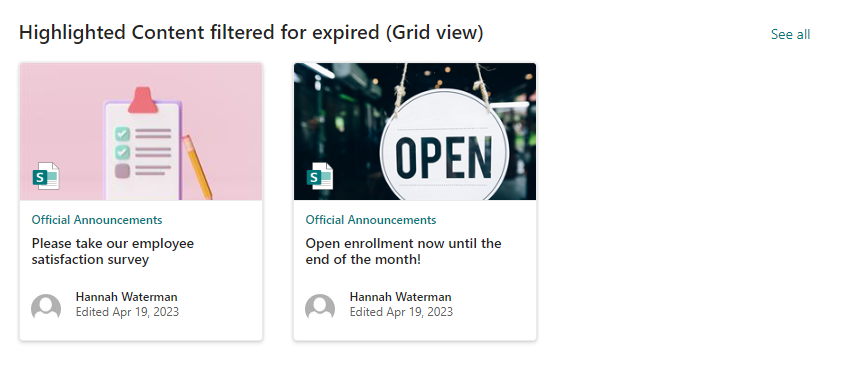
<Announcements-03.png Alt text – Screenshot of the Highlighted Content web part which displays two announcement pages>
Use the PnP Modern Search web part
Similar to Highlighted Content with setting up managed properties, but you have full control over the display.
- Follow steps 1-7 from the previous solution for Highlighted Content.
- Find the latest release of the PnP Modern Search web part and look for the Assets section to download the .sppkg file. Install this into your tenant app catalog (or site collection-scoped app catalog).
- On your intranet home page, add the PnP – Search Results web part to your page. In the first configuration panel, add this code to your query template (update your Announcements site URL and update the RefinableDate value to match the one you configured):
<< code view >>
{searchTerms} Site:https://yourtenant.sharepoint.com/sites/YourAnnouncementsSite ContentTypeId:0x0101009D1CB255DA76424F860D91F20E6C4118* PromotedState:2 RefinableDate00>={today}
<< end code view >> - Under Selected properties, type RefinableDate00 (your refinable date value) and hit Enter to select it.
- Click Next to go to the next configuration panel. Choose the “Custom” layout and click the curly brackets next to “Edit results template” to edit the handlebar template. Copy and paste this code into your template:<< insert code view component with announcement-pages.html >>
The custom handlebar template has been configured to look something like the screenshot below. If you’re comfortable with HTML and CSS, you can update the template with your own desired layout.
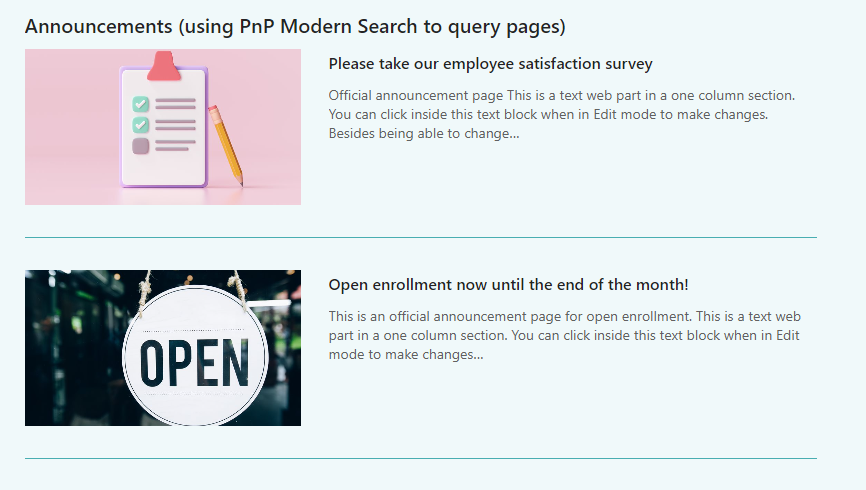
<Announcements-04.png – Alt text: Screenshot of an announcements web part, where each announcement displays the page photo, title, summary text, and dividing line. The look and feel mimics the out-of-the-box news web part.>

Use List View formatting
For simple, short announcements, driven by a list on the intranet site.
Note: If you already have a classic announcements list, note that list formatting won’t work with rich text fields, so you’ll have to make sure your list only has plain text fields. Our sample list will use these columns:
- Title (OOTB)
- AnnouncementText (plain text)
- AnnouncementLink (hyperlink – optional link for going to more information)
- AnnouncementPublish (date/time – add this field if you want to also schedule announcements)
- AnnouncementExpiration (date/time – add this field if you want to expire announcements)
- On your intranet site, click on the gear and go to Site Information, then click View all site settings. Click on Site columns.
- Click Create to create a new site column. Call this “AnnouncementText” and choose Multiple lines of text. Under Specify the type of text to allow, select Plain text. Click OK.
- Click Create again to create a new site column. Call it “AnnouncementLink” and choose Hyperlink or Picture. Make sure Format URL is set to Hyperlink and click OK.
- Click Create. Call this “AnnouncementPublish” and choose Date and Time. Look for Date and Time Format and choose Date & Time. Click OK.
- Click Create. Call this “AnnouncementExpiration” and choose Date and Time. Look for Date and Time Format and choose Date & Time. Click OK.
- Go back to the home page of your intranet, click the New button, and choose List. Select Blank list. Call the list “Announcements” and uncheck “Show in site navigation” and click Create.
- In your new list, click the gear and go to List Settings. Under Columns, click Add from existing site columns. Choose the four fields you just created and click Add, then OK.
- Click the Announcements title to return to the normal list view. Add some announcements to your list, making sure to fill out the publish and expiration fields if you included them.
- Click on the “All items” view dropdown and choose Create new view.
- Name the new view “Announcements” and click Create.
- Make sure Announcements is selected in the view dropdown. Click the view dropdown and select Edit current view.
- Under Sort, choose “AnnouncementPublish” and “Show items in descending order” for the first sort, then “AnnouncementExpiration” and “Show items in ascending order” for the second sort.
- Under Filter, select “Show items only when the following is true.” Choose “AnnouncementExpiration” from the column dropdown and “is greater than” from the operations dropdown. Type “[Today]” in the value field.
- Click “And” for the next filter. Select “AnnouncementPublish” and set it to “is less than or equal to,” and type “[Today]” in the value field.
- Click OK to save the view settings and return to the list view.
- Click on the view dropdown again, and this time, choose Format current view. Make sure “List” is chosen, and click Advanced mode. Copy and paste the following code into the JSON field and click Save.<< insert code view component with announcement-list-format.txt >>(Note: If your column names are different, you’ll want to go through the code and replace the internal column names with your lists’ field names.)
- This should apply a nice format to the list view! Return to your intranet home page and edit the page. Add the List web part and choose your announcements list. Edit the web part properties and choose your “Announcements” view from the view dropdown. Toggle to hide the command bar and see all buttons.
Using the list web part embeds that formatted view onto your intranet home page, and it will look something like this:
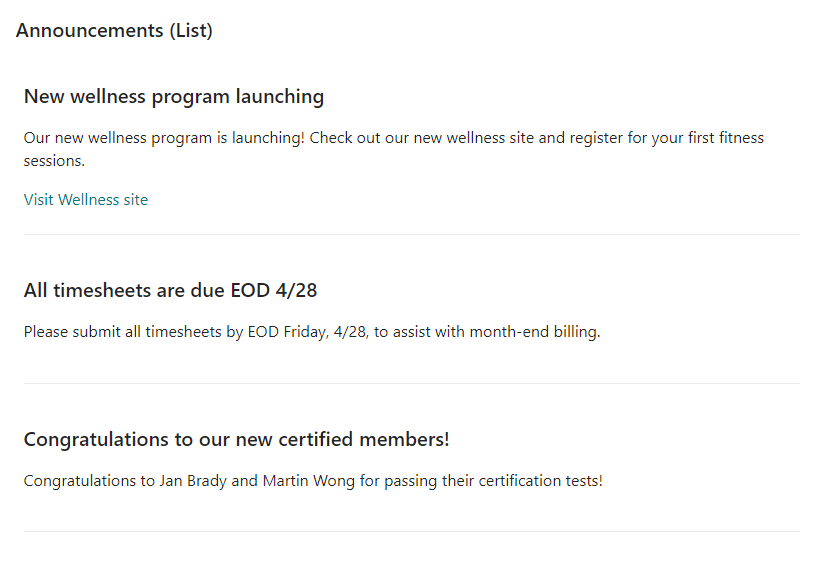
<Announcements-05.png – Alt text: Screenshot of a simple announcements list. Each item shows a title, short text, optional link, and dividing line. The look and feel mimics the out-of-the-box news web part without page images.>
Use the PnP Modern Search web part
If you want to roll up announcements with rich text from multiple sites to your home page, follow these steps:
- See the List Formatting solution, steps 1-8 (create site columns, add to your custom list), as you’ll follow the same basic principles to set up a custom list. However, use this structure instead:
- Title (OOTB)
- AnnouncementText (this can be rich text, so we do not need a separate link field)
- AnnouncementPublish (date/time – add this field if you want to also schedule announcements)
- AnnouncementExpiration (date/time – add this field if you want to expire announcements)
- You will now want to map managed properties. This requires SharePoint admin permissions. In the SharePoint admin center, go to More features, then click to open the Search feature, and click Manage Search Schema. Type “Refinabledate” in the search box and click the green arrow to pull up the refinable date properties. Look for a date that does not have anything in the Mapped crawled properties column and click the property name to edit. Scroll down to the mappings section at the bottom and click Add a mapping. Search for “announcement” and select the ows_q_DATE_AnnouncementExpiration crawled property. Click OK.
- Repeat this to map another RefinableDate field to ows_q_DATE_ANNOUNCEMENTPUBLISH.
- Find the latest release of the PnP Modern Search web part and look for the Assets section to download the .sppkg file. Install this into your tenant app catalog (or site collection-scoped app catalog).
- On your intranet home page, add the PnP – Search Results web part to your page. In the first configuration panel, click the Layout slots Customize button. In the Summary slot field, replace Hithighlightedsummary with AnnouncementTextOWSMTXT.
- Now, add this code to your query template (update your announcements list URL and update the RefinableDate values to match the ones you configured):
<< code view >>
{searchTerms} Path: https://yourtenant.sharepoint.com/sites/YourAnnouncementsSite/Lists/AnnouncementList/ RefinableDate00>{today} RefinableDate01<={today}
<< end code view >> - Under Selected Properties, type “RefinableDate00” (or your refinable date field value) and hit enter to select it. Type “RefinableDate01” and hit enter to select the next managed property date value that you set. Now, click the dropdown and find AnnouncementTextOWSMTXT and check it to select it.
- Hit the Next button. In the second panel, select the Custom layout option. Click the curly brackets next to Edit results template to edit the handlebar template. Copy and paste this code into your template:
<< insert code view component with announcement-list.html >>
The custom handlebar template has been configured to look something like the screenshot below. If you’re comfortable with HTML and CSS, you can update the template with your own desired layout.
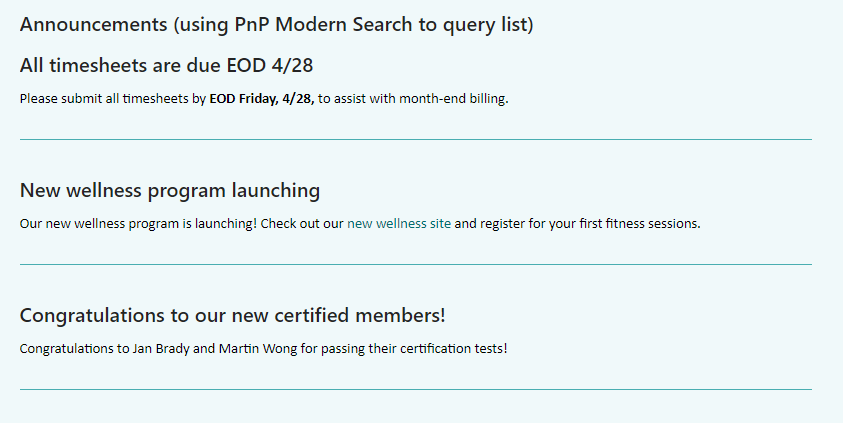
<Announcements-06.png – Alt text: Screenshot of a simple announcements list. Each item shows a title, short text, optional link, and dividing line. The look and feel mimics the out-of-the-box news web part without page images. >
Resources
Here’s a list of additional resources you can refer to if you need further assistance or information.
- View my code in Github
- Microsoft doc: Use the News web part on a SharePoint page
- Microsoft doc: Use the Highlighted content web part
- Microsoft doc: List view formatting
- Microsoft doc: Manage apps using the Apps site – Add custom apps
- Microsoft doc: Use the site collection app catalog
- PnP Modern Search v4
To intranet announcements and beyond!
We hope you feel empowered to implement announcements on your own site. Additionally, we believe that these examples have provided you with a deeper understanding of various methods to roll up content within and between sites, all without the need for custom development and code. If you’ve implemented a low-code intranet announcement feature beyond our five – or six – examples, we’d love to hear about your creativity – comment below! If you believe you need further assistance with custom solutions tailored to your unique needs, please don’t hesitate to contact us! Our team of technology experts is eager to help you unlock your full productivity potential and enable you to work the way you want.