Author
ali.razmi

For organizations dealing with extensive document volumes, the weight of manual efforts can be overwhelming, and the demand for data accuracy is non-negotiable. This is where Microsoft Syntex for content extraction enters the scene as a transformative force. It stands as an intelligent document processing and compliance service that harnesses the power of advanced AI and machine learning to boost efficiency and precision in the modern workplace. Today, our aim is to further explore how Microsoft Syntex can revolutionize your content management and significantly reduce the burden of manual work.
What is Microsoft Syntex?
Microsoft Syntex, formerly known as SharePoint Syntex, is a powerful Content AI tool that leverages intelligent document processing, content artificial intelligence (AI), and advanced machine learning to streamline and automate content-related tasks within organizations. Initially integrated into SharePoint, this technology has expanded its reach to Microsoft 365 and Teams, offering a wide range of capabilities to transform how businesses manage digital content.
What is it capable of?
At its core, Microsoft Syntex is an intelligent document processing that transforms raw data within documents into actionable knowledge, enabling organizations to make informed decisions with ease.
But how does it achieve this? Microsoft Syntex is a harmonious blend of cutting-edge technologies, including machine learning models, cognitive services, and Azure AI. What sets it apart is its ability to adapt and “train” itself to understand your unique business needs. With this knowledge, it automatically identifies and classifies content, taking a significant load off your shoulders.
Microsoft Syntex serves as an exceptionally intelligent document assistant. It comprehends the content within your documents, such as contracts or reports, and extracts critical information. It then organizes this information, making it readily accessible for future use. For instance, if you have a multitude of contracts, Syntex can automatically tag them with essential details like expiration dates or contract types. This eliminates the need for manual searches, allowing you to locate vital information swiftly.
Why Microsoft Syntex?
Efficient content transformation
Whether you’re facing extensive manual document processing or the challenge of finding the right information amid a sea of digital assets, Microsoft Syntex offers assistance. Leveraging its AI-driven capabilities, it rapidly converts data into actionable knowledge, resulting in time savings, cost reduction, and improved security.
Automated content management
Instead of sifting through countless files, Microsoft Syntex takes the reins by autonomously reading, tagging, classifying, summarizing, and translating various types of content in mere seconds. This frees up your team to focus on more strategic tasks.
Content understanding and compliance
Microsoft Syntex is your go-to content understanding, processing, and compliance service. It employs intelligent document processing, content AI, and advanced machine learning to automatically and thoughtfully discover, organize, and categorize documents across your SharePoint libraries, Microsoft Teams, OneDrive for Business, and Exchange.
What are content extractors and their benefits?
In the world of digital content management and data processing, a content extractor is a valuable tool that plays a pivotal role in automatically retrieving specific information or data from a variety of sources, including documents, images, and more. It serves as a digital assistant that can identify and extract relevant data from unstructured content, presenting it in an organized and structured format.
Here’s why content extractors are both helpful and essential:
Streamlining data extraction
One of the primary advantages of content extractors is their ability to streamline the data extraction process. Instead of manually sifting through vast amounts of unstructured information, content extractors can automatically identify and capture the data you need. This not only saves time but also reduces the risk of human error.
Increased efficiency
By automating data extraction tasks, content extractors boost operational efficiency. They can process large volumes of content at a much faster rate than manual methods, allowing organizations to handle more data-intensive tasks and make quicker decisions.
Enhanced data accuracy
Human data entry is prone to errors, such as typos and omissions. Content extractors are designed to provide a higher level of accuracy by consistently extracting data in a standardized manner. This is particularly crucial for industries where precision and data quality are paramount, such as finance, legal, and healthcare.
Data-driven insights
Content extractors contribute to data-driven decision-making by rapidly extracting valuable insights from unstructured content. This is especially important in today’s data-driven world, where organizations rely on actionable information to stay competitive.
A content extractor acts as a digital assistant that not only saves time and enhances data accuracy but also empowers organizations to make informed decisions, stay compliant, and efficiently manage their content.
By automating data extraction and transforming unstructured content into actionable insights, content extractors are a key driver of efficiency, accuracy, and productivity across various industries. They enable businesses to unlock the full potential of their data, paving the way for smarter and more informed decision-making.

Microsoft Syntex for Content Extraction
Now that we know what content extractors are, let’s discuss how we can create one using Microsoft Syntex.
Step 1: Create and name your extractor
- From the model home page, navigate to the “Create and train extractors” tile and select “Train extractor.”
- On the “New entity extractor” screen, provide a name for your extractor in the “New extractor name” field. For example, you can name it “Service Start Date” if your goal is to extract the service start date from Contract Renewal documents.
- By default, the column type is set to “Single line of text.” If needed, you can change the column type by selecting “Advanced settings” > “Column type” and choosing the desired type.
- Once you’re ready, click “Create.”
Step 2: Add a label
- After creating the extractor, you’ll be directed to the extractor page, where you’ll see a list of your sample files.
- Select the first file from the list, and it will be displayed in the viewer.
- Highlight the data you want to extract from the file (e.g., the Start Service Date) and click “Save.” The value will appear in the “Labeled examples” list under the “Label” column.
- Select “Next file” to proceed to the next file, or click “Save” and choose another file from the “Labeled examples” list.
- Repeat the process until you have labeled the entity in all five files.
- Once you’ve labeled five files, a notification banner will prompt you to move to the next step, which is training.
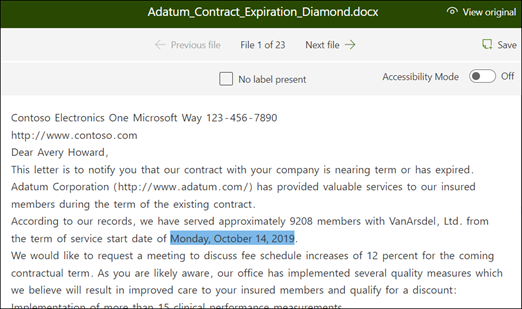
Step 3: Use “Find” to search your file
The Find feature allows you to search for the entity you want to label within your document, particularly useful for large documents or instances with multiple occurrences of the entity. You can select the specific instance you need from the search results to label it.

Step 4: Add an explanation
- To enhance the accuracy of your extractor, you can create an explanation that provides hints about the entity’s format and potential variations in sample documents.
- In the “Explanation” section, click “New” and give it a name (e.g., “Date”).
- Choose “Pattern list” as the type.
- Provide variations of the date format as they appear in your documents, such as different date formats.
- Click “Save.”
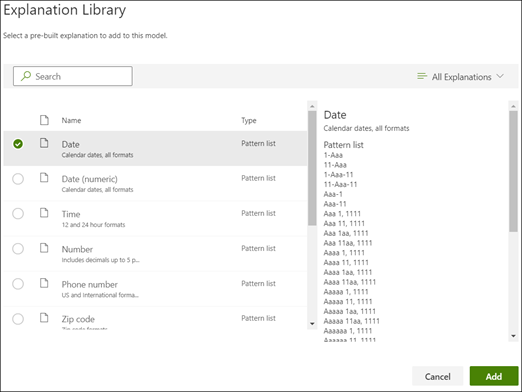
Step 5: Use the explanation library
When it comes to creating explanations, especially for items like dates, the Microsoft Syntex platform offers a convenient solution through its built-in explanation library. This library simplifies the process by providing pre-built phrase and pattern explanations, saving you the effort of manually entering all possible variations. It’s particularly valuable for common items such as dates, phone numbers, zip codes, and more.
Here’s how to make the most of the explanation library, using the example of the “Service Start Date” extraction:
- In the “Explanation” section of your extractor, start by selecting “New,” and then opt for “From explanation library.”
- Within the explanation library, locate and choose “Date.” You’ll find a comprehensive list of recognized date variations.
- Click “Add” to incorporate the selected date explanation into your project.
- As you move to the “Create an explanation” page, you’ll notice that the fields are automatically populated with the Date information from the explanation library.
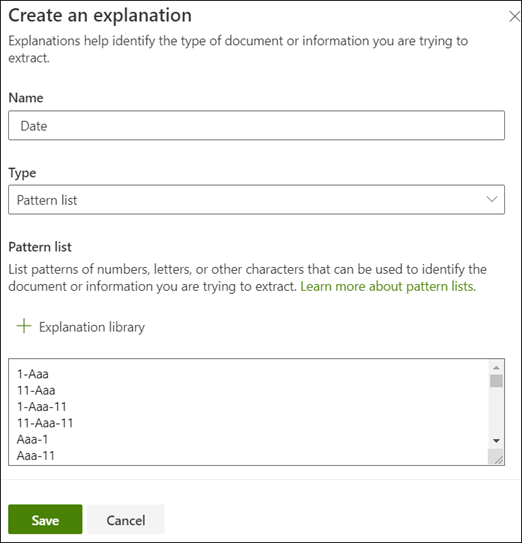
- To finalize the process, simply click “Save.”
Step 6: Train the model
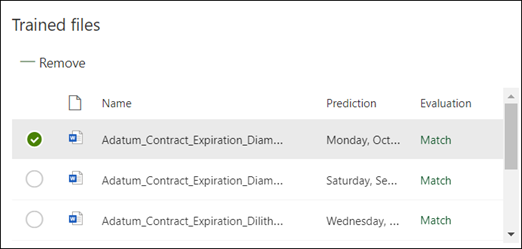
Saving your explanation initiates the training process. If your model has sufficient information from the labeled examples, you’ll see each file labeled with “Match.” Mismatches indicate that additional information may be required.
Step 7: Add another explanation
In case of mismatches, consider adding another explanation to provide the model with more information.
- Within the Explanation section, choose “New,” and proceed by entering a name (e.g., Prefix String).
- Select “Phrase list” as the Type.
- Set “Service Start Date of” as the designated value.
- Lastly, click “Save” to confirm your selection.
Step 8: Train the model again
Saving the additional explanation will trigger another round of training, now incorporating both explanations.
Step 9: Test your model
You can test your model on unlabeled sample files to assess its performance before using it extensively. The “Test” tab allows you to evaluate how well the model extracts information from unseen files.
Step 10: Further refine an extractor
When you encounter situations where you have duplicate entities and wish to extract only specific values or a particular number of values, you have the ability to refine your extractor with customized rules. These rules allow you to precisely dictate how the extraction process should be handled.
- From the model home page, in the Entity extractors section, select the extractor you want to refine, and then select Refine extracted info.
- On the “Refine extracted info” page, you’ll be presented with various rule options:
- Keep one or more of the first values
- Keep one or more of the last values
- Remove duplicate values
- Keep one or more of the first lines
- Keep one or more of the last lines
- Choose the rule that aligns with your extraction needs, and click “Refine.”
- Select the extractor you want to edit, click on “Refine extracted info”, make the necessary changes to the number of lines or values, and save your edits by selecting “Save.”
- To remove a refinement rule from an extractor, follow these steps: Choose the extractor from which you wish to eliminate the rule, select “Refine extracted info,” and then click on “Delete.”
By following these ten steps, you can create powerful content extractors tailored to your organization’s needs, enhancing data management and efficiency, as we demonstrate in the following case study.
Richter’s case study | Boosting efficiency and reducing manual effort with Microsoft Syntex
Approaching a century in the financial industry, Richter stands as one of Canada’s largest independent financial and accounting firms, serving families and businesses across North America. Richter’s Request-For-Offer (RFO) team faced a significant challenge in streamlining their financial statement processing from email and mail rooms. The manual organization of documents into specific folders consumed valuable productive time and proved labor-intensive. Seeking an automation solution to address these issues and enhance document search capabilities, Richter turned to us.
Leveraging the capabilities of Microsoft Syntex, Creospark implemented a comprehensive solution that automated the processing of financial statements. Eight distinct Syntex models extracted crucial metadata from various financial statement types, reducing manual effort and improving operational efficiency. The solution included a custom Power App, empowering the RFO team with efficient statement navigation and exception management. This intuitive app also integrated seamlessly with the client’s APX system, enhancing information relevance and decision-making capabilities.
The outcome was a transformation of the client’s financial statement processing workflow. Manual efforts that previously took 2 days to process 100 statements with exceptions can now be completed in less than 20 minutes. This significant reduction in manual labor led to streamlined operations and faster information extraction. The tailored Power App provided an intuitive user-centric navigation tool, and an improved search experience simplified finding statements. Integration with the APX system brought precision to information extraction, and a Metadata dropdown field enhanced data relevance. In summary, Creospark’s solution brought remarkable efficiency, accuracy, and user-friendliness to the client’s financial statement processing, revolutionizing their operations.
A quick recap
In this blog, we dived into the capabilities of Microsoft Syntex, a powerful AI tool capable of processing documents intelligently, transforming raw data into actionable knowledge. Acting as a diligent personal assistant, it understands, extracts, and organizes critical information, such as contracts or reports, simplifying content management and eliminating the need for manual searches. With benefits including efficient content transformation, automated management, and content understanding and compliance, Microsoft Syntex is a valuable asset for organizations seeking to enhance content-related workflows.
Additionally, we explored the significance of content extractors and outlined ten essential steps for creating content extractors using Microsoft Syntex, and we showcased a real-world case study where Richter, a financial and accounting firm, leveraged Syntex to drastically reduce manual effort and enhance financial statement processing. If you’re interested in harnessing the potential of Microsoft Syntex to build content extractors that boost efficiency and automate content management, please don’t hesitate to reach out to our team.